Intelligent digital clock can let users with time management to make life easier. If you care for seniors, move between time zones, or live with daylight saving time, you may already have searched “how to change time on digital calendar day clock” more than once.
This guide explains why digital day clocks confuse so many users and gives you a simple way to set the time on almost any model. It also shows where a WiFi digital day clock helps when you are tired of fixing the same problem over and over.
Why Do Digital Day Clocks Confuse So Many Users?
On the front, most day clocks look simple: big digits, clear date, weekday spelled out. On the back, things are less friendly. Different makers use different labels, different button logic, and different menu flows, so the basic task of changing the time feels new every time you meet a new model.
Button Labels Vary Across Brands
Some clocks use “Set”, some “Mode”, some “Clock”, and some just icons. When you pick up a new digital day clock without the manual, you often press a few buttons just to see what happens. That guesswork is usually where the confusion starts.
Hidden or Multi-Function Buttons
To save space, one button often does several things. A short press might change the display, a long press might enter time-setting mode, an extra-long press might reset everything. Manuals often mention “press and hold for 3 seconds until the numbers blink” in one short line. Easy to miss, and easy to forget.
Multiple Display Modes
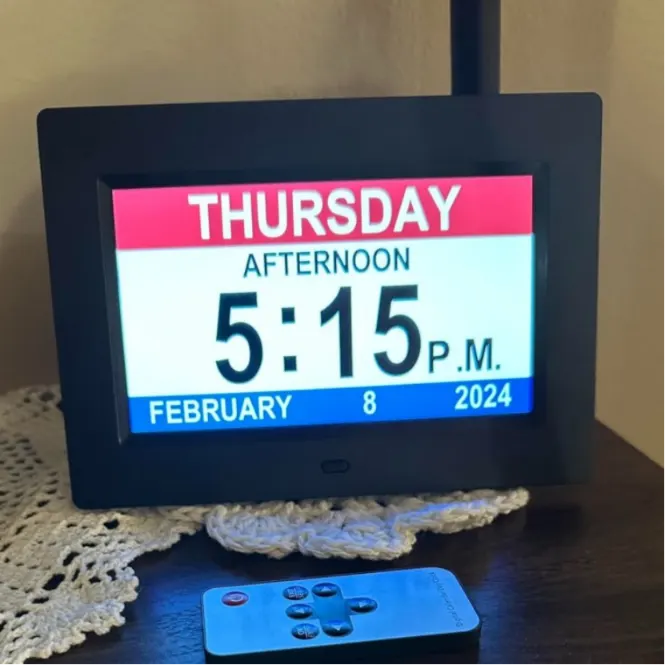
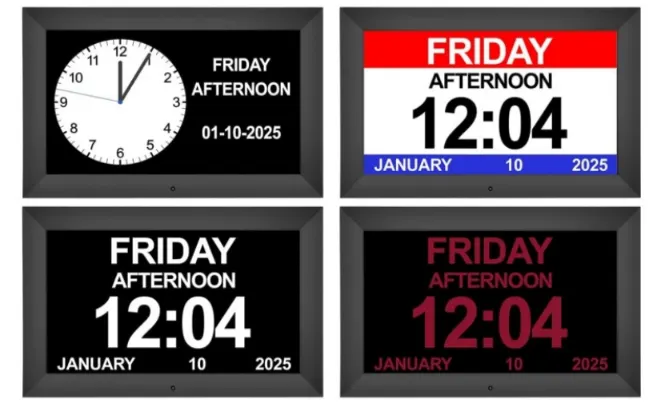
Square digital clock switch support for 12 hours and 24 hours format, date format, also supports 10 languages and display interface can choose a variety of time switch. For seniors, a 24-hour format can actually be clearer, but only if someone sets it up correctly.
DST and Time Zone Confusion
Traditional electronic mechanical clock is bound to time no need to manually adjust, intelligent electronic clock more precise reduce adjustment steps, WiFi can automatic calibration function of clock. People often try to “fix” the hour when the real fix is choosing the right time zone.
What Should You Check Before Changing Time on Any Digital Day Clock?
Before you start pressing buttons at random, it helps to check a few basics. This takes a minute and can save you ten.
Is The Clock Using Battery, Adapter, or Both?
Some models have a power adapter plus a backup battery. If the backup battery is flat, the time resets whenever the power goes off. Then you change the time again and again. So first make sure power and backup are in good shape.
Locate The Main Control Buttons
Turn the clock around and find the main keys. Most units use some mix of Set, Mode, Up, Down, and maybe an Alarm button. Reading the labels properly, even taking a quick photo, makes the next steps much easier.
Check If It’s a Smart or Manual Model
Older clocks are fully manual. Newer ones, especially WiFi models, can sync to internet time. If your digital day clock connects to WiFi, you may only need to confirm network and region once. After that the time and date refresh by themselves.
How Do You Enter The Time-Setting Mode on Most Models?
No matter which brand you hold, the key is getting into time-setting mode. In that mode, one part of the display blinks to show what you can change. If nothing blinks, you are still in normal mode, and nothing you press will save.
Method 1 – Long Press The “Set” Button
On many clocks, you press and hold Set for three to five seconds. The year or hour starts flashing. From there, each tap of Set moves you to the next field. This pattern is common on simple models.
Method 2 – Long Press “Mode” Until Numbers Blink
Other models use Mode as the entry key. Hold Mode until something on the display blinks, often the hour. Then Up and Down adjust the value, while Mode moves you through the fields.
Method 3 – Use a Button Combination
Some units rely on a combination like holding Mode and Up together, or Set and Down. If a long press on Set or Mode does nothing, trying a simple combo is worth a shot before you give up.
How Do You Change The Time, Date, and Day on Any Digital Day Clock?
Once you are in setting mode, most clocks follow a similar path: year, month, day, hour, minute, sometimes weekday. You just follow what is blinking.
Step 1 – Set The Year, Month, and Day
When the year is flashing, tap Up or Down to adjust it. Press Set or Mode to jump to month, then to day. Watch how the date is shown on the screen so you do not mix up day and month.
Step 2 – Set The Hour Format
Next comes the hour. Here many people stumble. 12 hours AM/PM mode tag allows users to obtain correct time, different formats of time transformation can adapt to different living habits of the family.
Step 3 – Set The Minutes
When the minutes blink, tap Up or Down until they match your reference time. A long press usually scrolls faster; short taps let you fine tune the last few minutes.
Step 4 – Exit and Save
Some clocks save changes if you stop pressing keys for a few seconds. Others expect one final tap on Set or Mode to confirm. If the time jumps back to the old value, it often means you left the mode without saving.
What If Your Digital Day Clock Supports WiFi or Auto Update?
Manual setting works, but it can get annoying if you move, swap sockets, or look after someone who cannot adjust the time alone. That is where WiFi and auto update features start to make sense.
Auto Sync Via WiFi
YIAISIGN 10.1-inch WiFi digital day clock connects to a network time server and syncs regularly.
Automatic DST Adjustment
When the region is set correctly, many smart models adjust for daylight saving time by themselves. The clock jumps forward or back at the right date, without you touching anything.
Why Does Your Digital Clock Still Show The Wrong Time?
Even with careful setup, you may sometimes see the wrong time on screen. Usually the cause is one of a few common issues.
The Time Zone Is Wrong
If the clock is always off by a whole number of hours, check the time zone settings first. Changing the region to the right city usually fixes that.
Backup Battery Is Dead
If the time resets every time you move the plug, the backup battery may be empty. A fresh battery often solves that problem in a few seconds.
Buttons Are Stuck or Unresponsive
Old, dusty buttons can stick or fail to send signals. A gentle clean around the buttons can help. If nothing responds, the hardware itself may be past its best days.
DST Settings Are Off
If your area uses daylight saving time but the DST option is off, the clock may always be one hour wrong in summer or winter. Turning DST on or off to match local rules usually solves that.
What Is A Quick Checklist for Any Model?
When you stand in front of a random day clock, you can use the same quick routine every time. Check power and backup battery. Find Set, Mode, Up, Down. Long press Set or Mode until something blinks. Use Set or Mode to move through year, date, hour, minute. Use Up and Down to change values. Confirm 12-hour or 24-hour mode. On WiFi models, also check time zone and network. If you follow that short list, most models stop feeling like a puzzle.
Who Can You Turn To for Reliable Digital Time Displays?
If you want a clock from a supplier that treats displays as a core business, not a side product, it helps to look at a company active in digital signage and display devices as well as clocks. YIAISIGN focuses on display products such as digital day clocks, WiFi digital photo frames, digital art frames, Android all-in-one machines, signage and portable monitors, and offers both hardware and software customization for projects. That kind of product range means experience with panels, brightness and embedded systems flows into clock design too. The 10.1-inch WiFi digital day clock is built as a clear desktop display with smart auto update, so it works well in homes, offices and care settings where you want a big readable screen and as little manual time setting as possible.
FAQ
Q1: Why is it so hard to figure out how to change time on a digital calendar day clock?
A: Mostly because every maker uses different button names and menu logic. Once you know to hold Set or Mode until the numbers blink, the whole process starts to feel much more similar between models.
Q2: How long should you hold the button to enter time-setting mode?
A: On many clocks, holding a main button for three to five seconds is enough. If nothing blinks after that, try another key or a simple combination like Mode with Up instead of tapping many random buttons.
Q3: Is a WiFi digital day clock really better than a manual one?
A: For places with daylight saving time, frequent moves, or seniors who cannot set the time alone, WiFi and auto update remove a lot of small annoyances. For a simple room with stable time and no DST, a basic manual clock can still work fine.
Q4: What if the time keeps resetting after a power outage?
A: That usually points to a flat backup battery or a model with no backup at all. If the clock is WiFi-based, it may recover the correct time after the network returns, but without backup power it still needs to rebuild its settings each time.
Q5: How can you choose a digital day clock that is easier for seniors to use?
A: Look for a large clear display that spells out the day and date, simple buttons and, if possible, WiFi auto update. In daily use, a readable screen and less fiddling with settings matter more than a long list of extra features.